PIC Tutorial Twelve - RF remote control.
![]() For
these tutorials you require two Main Boards (16F628), one main board
(16F876), LED Board, Switch Board, Joystick Board, RS232 Board, Analogue
Board and LCD Board. Download zipped
tutorial files.
For
these tutorials you require two Main Boards (16F628), one main board
(16F876), LED Board, Switch Board, Joystick Board, RS232 Board, Analogue
Board and LCD Board. Download zipped
tutorial files.
![]() This
tutorial is about using licence free radio modules, most countries now have
such modules available at low cost, although the exact frequencies may vary
between different countries. If you've tried to send plain RS232 via these
modules, you've probably found that it doesn't work?, I found this a number
of years ago, and a quick check with a scope soon showed why - the modules
are AC coupled, so you can't send a long continuous HIGH level, after a
fairly short period it breaks up and falls LOW. The standard RS232 sends a
continuous HIGH level when there's no data being sent, with a drop to LOW
being the START bit, so this method soon falls foul of the AC coupling - a
crude solution, (which I used with my original modules years ago) is to
invert the RS232 - hence the normal condition is LOW, and a START bit goes
HIGH. To do this using the hardware USART requires an external hardware
inverter, but for a software UART you can simply do the inversion in the
software (which is what I did).
This
tutorial is about using licence free radio modules, most countries now have
such modules available at low cost, although the exact frequencies may vary
between different countries. If you've tried to send plain RS232 via these
modules, you've probably found that it doesn't work?, I found this a number
of years ago, and a quick check with a scope soon showed why - the modules
are AC coupled, so you can't send a long continuous HIGH level, after a
fairly short period it breaks up and falls LOW. The standard RS232 sends a
continuous HIGH level when there's no data being sent, with a drop to LOW
being the START bit, so this method soon falls foul of the AC coupling - a
crude solution, (which I used with my original modules years ago) is to
invert the RS232 - hence the normal condition is LOW, and a START bit goes
HIGH. To do this using the hardware USART requires an external hardware
inverter, but for a software UART you can simply do the inversion in the
software (which is what I did).
![]() As I
suggested, this is rather crude, and while it worked well for the very short
range I was using it for, it's not really recommended, but there are a
number of ways to deal with the situation - the most common of which is
'Manchester coding', and it's this that we'll be dealing with in this
tutorial. While RS232 works on the width of individual pulses (9600 baud
being 105uS wide for each pulse) Manchester coding works on transitions from
HIGH to LOW (bit 0), or LOW to HIGH (bit 1), the actual width of the pulses
doesn't matter particularly (within reason) - this is good, because neither
IR or wireless preserve the exact width of the transmitted pulses. The
popular Philips RC5 IR remote control systems actually use this same coding
scheme.
As I
suggested, this is rather crude, and while it worked well for the very short
range I was using it for, it's not really recommended, but there are a
number of ways to deal with the situation - the most common of which is
'Manchester coding', and it's this that we'll be dealing with in this
tutorial. While RS232 works on the width of individual pulses (9600 baud
being 105uS wide for each pulse) Manchester coding works on transitions from
HIGH to LOW (bit 0), or LOW to HIGH (bit 1), the actual width of the pulses
doesn't matter particularly (within reason) - this is good, because neither
IR or wireless preserve the exact width of the transmitted pulses. The
popular Philips RC5 IR remote control systems actually use this same coding
scheme.
| This is the way the bits are actually sent, a bit 1 is a transition from 0 to 1, and a bit 0 is a transition from 1 to 0. |  |
![]() I'm
basing these tutorials on the routines by Peter JAKAB from
http://jap.hu/electronic/codec.html, incorporating his basic
encoding/decoding code within these tutorials, please visit his site and
check his remote controls based around them.
I'm
basing these tutorials on the routines by Peter JAKAB from
http://jap.hu/electronic/codec.html, incorporating his basic
encoding/decoding code within these tutorials, please visit his site and
check his remote controls based around them.
![]() The
first thing we need to discuss is the actual transmission format, we can't
just send a single byte like we do for RS232, radio transmission isn't
reliable enough, and if it misses the start bit then the complete byte will
be useless. So it's normal to use a PACKET system, where a number of
different pieces of information are transmitted after each other in the form
of a 'packet', this consists of a number of different sections:
The
first thing we need to discuss is the actual transmission format, we can't
just send a single byte like we do for RS232, radio transmission isn't
reliable enough, and if it misses the start bit then the complete byte will
be useless. So it's normal to use a PACKET system, where a number of
different pieces of information are transmitted after each other in the form
of a 'packet', this consists of a number of different sections:
- Header section - used to synchronise to the beginning of the packet.
- Address byte - this is a specific byte that the receiver checks, to make sure it's intended for this receiver.
- Data - at least one byte of data, but could be more - using more data bytes in larger packets speeds things up.
- Checksum - a checksum byte, used to make sure that the data is received correctly, if it fails the data should be discarded.
Header - This consists of a row of 20 bit one's, followed by a single bit zero. The long sequence of 1's gives the receiver time to settle, and the decoding software time to synchronise.
|
|
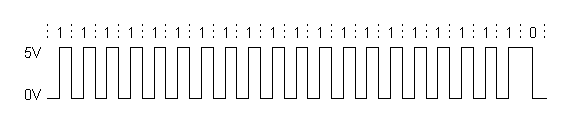 |
Address - This consists of the 8 bits of data in the byte, followed
by a single bit one, and a single bit zero.
|
|
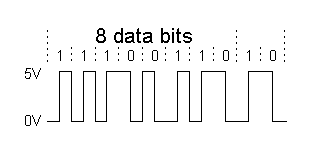 |
Data - This is the same as Address, 8 bits followed by a 1 and a 0.
Checksum - This is also the same as Address, 8 bits followed by a 1
and a 0.
![]() This
gives a total of 52 bits to send just a single 8 bit data byte, but by
transmitting more than one byte in a packet this can be improved, two bytes
will take only 62 bits, or four bytes only 82 bits.
This
gives a total of 52 bits to send just a single 8 bit data byte, but by
transmitting more than one byte in a packet this can be improved, two bytes
will take only 62 bits, or four bytes only 82 bits.
Tutorial 12.1
![]() This
tutorial comprises a transmitter unit (requiring one 16F628 main board and
the wireless transmitter board - Tut12_1T), and two receiver units, the
first outputs the received bytes via RS232 to your PC (requires one 16F628
main board, one RS232 board and the wireless receiver board - Tut12_1R), the
second is essentially the same, but rather than using the PC it uses an LCD
display (requires one 16F628 main board, one LCD board and the wireless
receiver board - Tut12_1RL). This tutorial uses a single byte packet, so
only one byte is sent at a time - the transmitter simply sends a short text
string one byte at a time, separated by a short delay.
This
tutorial comprises a transmitter unit (requiring one 16F628 main board and
the wireless transmitter board - Tut12_1T), and two receiver units, the
first outputs the received bytes via RS232 to your PC (requires one 16F628
main board, one RS232 board and the wireless receiver board - Tut12_1R), the
second is essentially the same, but rather than using the PC it uses an LCD
display (requires one 16F628 main board, one LCD board and the wireless
receiver board - Tut12_1RL). This tutorial uses a single byte packet, so
only one byte is sent at a time - the transmitter simply sends a short text
string one byte at a time, separated by a short delay.
The Wireless Boards connect to PortA, and the LCD or RS232 Boards connect to PortB.
Tutorial 12.2
![]() This
tutorial comprises a transmitter unit (requiring one 16F628 main board and
the wireless transmitter board - Tut12_2T), and two receiver units, the
first outputs the received bytes via RS232 to your PC (requires one 16F628
main board, one RS232 board and the wireless receiver board - Tut12_2R), the
second is essentially the same, but rather than using the PC it uses an LCD
display (requires one 16F628 main board, one LCD board and the wireless
receiver board - Tut12_2RL). This tutorial uses a four byte packet, so four
bytes are sent at the same time - the transmitter simply sends a four byte
string, which repeats after a short delay.
This
tutorial comprises a transmitter unit (requiring one 16F628 main board and
the wireless transmitter board - Tut12_2T), and two receiver units, the
first outputs the received bytes via RS232 to your PC (requires one 16F628
main board, one RS232 board and the wireless receiver board - Tut12_2R), the
second is essentially the same, but rather than using the PC it uses an LCD
display (requires one 16F628 main board, one LCD board and the wireless
receiver board - Tut12_2RL). This tutorial uses a four byte packet, so four
bytes are sent at the same time - the transmitter simply sends a four byte
string, which repeats after a short delay.
The Wireless Boards connect to PortA, and the LCD or RS232 Boards connect to PortB.
![]() Notice
that the first two tutorials are pretty well identical, with only the packet
size being changed, this is done by simply altering the buffer size, and
changing the packet size defined near the beginning of each program (packet_len
EQU 2) - please note, the packet_len constant includes the address byte, so
needs to be one greater than the data packet size.
Notice
that the first two tutorials are pretty well identical, with only the packet
size being changed, this is done by simply altering the buffer size, and
changing the packet size defined near the beginning of each program (packet_len
EQU 2) - please note, the packet_len constant includes the address byte, so
needs to be one greater than the data packet size.
Tutorial 12.3
![]() This
tutorial comprises a transmitter unit (requiring one 16F628 main board, a
switch board and the wireless transmitter board - TUT12_3T), and one
receiver unit (requires one main board, one LED board and the wireless
receiver board - TUT12_3R). This tutorial uses a single byte packet, so only
one byte is sent at a time - the transmitter simply sends the packet while a
transmit button is pressed, different buttons send different data bytes, and
you can turn the receiver LED's ON and OFF, two buttons turn them ON, and
the other two turn them OFF - a simple radio remote control.
This
tutorial comprises a transmitter unit (requiring one 16F628 main board, a
switch board and the wireless transmitter board - TUT12_3T), and one
receiver unit (requires one main board, one LED board and the wireless
receiver board - TUT12_3R). This tutorial uses a single byte packet, so only
one byte is sent at a time - the transmitter simply sends the packet while a
transmit button is pressed, different buttons send different data bytes, and
you can turn the receiver LED's ON and OFF, two buttons turn them ON, and
the other two turn them OFF - a simple radio remote control.
The Wireless Boards connect to PortA, the Switch and LED Boards connect to PortB.
Tutorial 12.4
![]() This
tutorial comprises a transmitter unit (requiring one 16F628 main board, a
switch board and the wireless transmitter board - TUT12_4T), and one
receiver unit (requires one main board, one LED board and the wireless
receiver board - TUT12_4R). This tutorial uses a single byte packet, so only
one byte is sent at a time - the transmitter simply sends the packet while a
transmit button is pressed, different buttons send different data bytes, but
this time you can toggle the receiver LED's ON and OFF - a simple toggling
radio remote control. This gave me a few problems though, initially I tired
to use exactly the same transmitter code as the previous example, but I was
struggling to identify a new key press of the same button (particularly as
they repeat whilst held down). Eventually I hit on the idea of modifying the
transmitter code as well - so while you hold the button down the same code
repeats, but when you let it go, a different code (actually 0x00) is sent to
inform the receiver the button has been released. Incidentally, I mentioned
the Philips RC5 IR remote system above, this actually uses an extra bit to
signify a new button press or just a repeat signal while the button is held
down - rather than implement that type of system I decided on a 'release'
transmission instead.
This
tutorial comprises a transmitter unit (requiring one 16F628 main board, a
switch board and the wireless transmitter board - TUT12_4T), and one
receiver unit (requires one main board, one LED board and the wireless
receiver board - TUT12_4R). This tutorial uses a single byte packet, so only
one byte is sent at a time - the transmitter simply sends the packet while a
transmit button is pressed, different buttons send different data bytes, but
this time you can toggle the receiver LED's ON and OFF - a simple toggling
radio remote control. This gave me a few problems though, initially I tired
to use exactly the same transmitter code as the previous example, but I was
struggling to identify a new key press of the same button (particularly as
they repeat whilst held down). Eventually I hit on the idea of modifying the
transmitter code as well - so while you hold the button down the same code
repeats, but when you let it go, a different code (actually 0x00) is sent to
inform the receiver the button has been released. Incidentally, I mentioned
the Philips RC5 IR remote system above, this actually uses an extra bit to
signify a new button press or just a repeat signal while the button is held
down - rather than implement that type of system I decided on a 'release'
transmission instead.
As in the previous tutorial, the Wireless Boards connect to PortA, the Switch and LED Boards connect to PortB.
Tutorial 12.5
![]() This
tutorial comprises a transmitter unit (requiring one 16F876 main board, the
analogue board and the wireless transmitter board - TUT12_5T), and one
receiver unit, that outputs the received bytes via RS232 to your PC
(requires one 16F628 main board, one RS232 board and the wireless receiver
board - TUT12_5R). The transmitter board reads the two analogue inputs, then
transmits the two 10 bit readings as four hexadecimal bytes (just as the A2D
provides them), it does this repeatedly, with a short delay between each
transmission. The receiver converts the two 10 bit values into decimal, and
sends them to the PC over RS232 as ASCII characters, separated by a comma,
and ended with a CR/LF - this will display nicely in HyperTerminal, and is
easily imported into many PC programs. This tutorial uses a four byte
packet, so the four bytes are sent in a single packet.
This
tutorial comprises a transmitter unit (requiring one 16F876 main board, the
analogue board and the wireless transmitter board - TUT12_5T), and one
receiver unit, that outputs the received bytes via RS232 to your PC
(requires one 16F628 main board, one RS232 board and the wireless receiver
board - TUT12_5R). The transmitter board reads the two analogue inputs, then
transmits the two 10 bit readings as four hexadecimal bytes (just as the A2D
provides them), it does this repeatedly, with a short delay between each
transmission. The receiver converts the two 10 bit values into decimal, and
sends them to the PC over RS232 as ASCII characters, separated by a comma,
and ended with a CR/LF - this will display nicely in HyperTerminal, and is
easily imported into many PC programs. This tutorial uses a four byte
packet, so the four bytes are sent in a single packet.
On the transmitter the Wireless Board connects to PortB, and the Analogue Board to PortA (because the Analogue Board MUST use PortA), on the receiver the Wireless Board connects to PortA, and the RS232 Board to PortB.